
Having trouble receiving emails on your intoHOST account can be a significant inconvenience, especially if you rely on email communication for your business or personal affairs. If you can send emails but not receive them, follow this comprehensive guide to troubleshoot and resolve the issue.
SMTP Settings Misconfiguration in your Mail Client
To resolve issues related to SMTP Authentication, follow these essential steps:
Solution: Enable SMTP Authentication
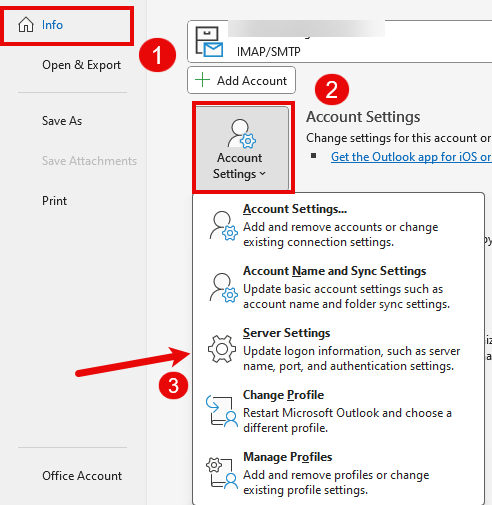
Based on your mail client, the exact steps may differ; the following guide is for Outlook. Your email client must be configured to authenticate with the outgoing mail server before sending emails. This involves enabling a specific option within your email client settings:
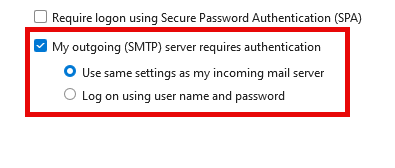
- Enable SMTP Authentication: Ensure the option 'My outgoing (SMTP) server requires authentication' is checked. For example, you can find this setting in Microsoft Outlook by navigating to the 'More Settings' option within the account settings under the 'Outgoing Server' tab.
ISP Restrictions
Solution 1: Use an Alternative SMTP Port
You can change the SMTP port in your email client's settings. For guidance on configuring these settings in various email clients, please visit our knowledge base articles:
Solution 2: Use Webmail
For more information on accessing webmail, check out our guide on how to access webmail from outside of cPanel.
Solution 3: Contact Your ISP
Exceeding Email Sending Limits
Here are some common limits placed by intoHOST to prevent abuse
-
Outgoing Email Limits: To prevent spamming, most hosting services, including intoHOST, limit the number of emails an account can send within an hour or a day using WHM. If you exceed this limit, you'll temporarily be unable to send emails.
-
Email Size Limits: There's also a cap on the size of the emails you can send, including attachments. Exceeding this size will result in a failed send attempt.
-
Quota Exceedance: Each email account has a storage quota. If your inbox or sent items are full, you might not send new emails until space is freed.

How to Resolve Sending Issues
-
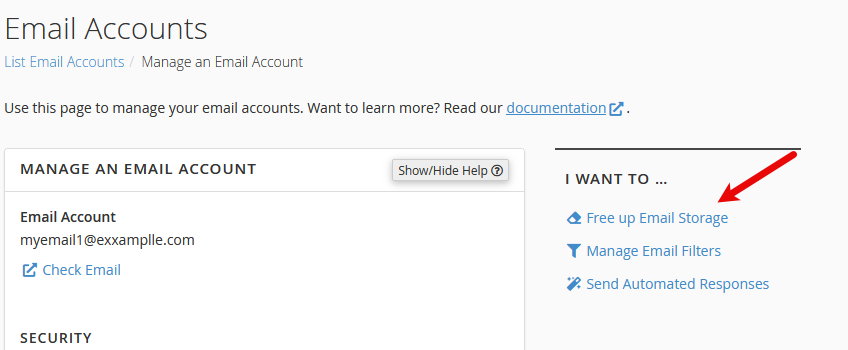
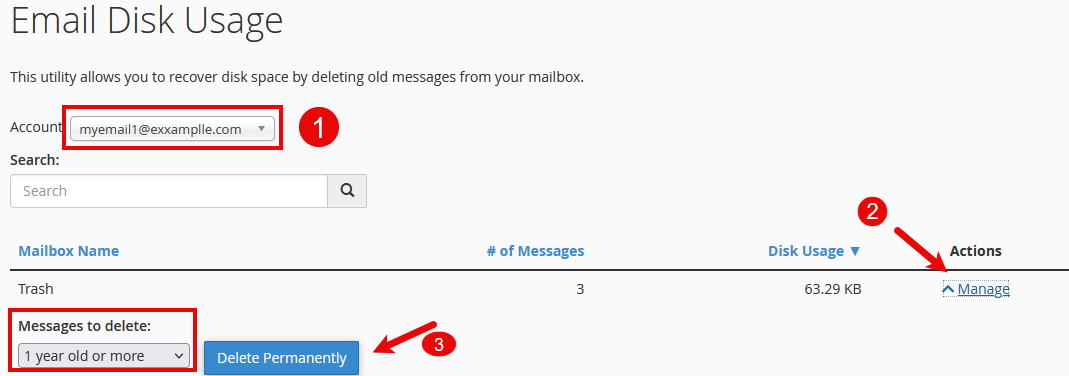
Check Your Quota: First, check if your email account has exceeded its storage limit. You can do this through the cPanel control panel. If you're close to or have exceeded your limit, it's time to clean up. Delete old or unnecessary emails and empty your trash to free up space.
-
Review Email Sending Limits: Familiarize yourself with the sending limits of your email service. intoHOST's limits are designed to balance user needs with server health. If you've hit your limit, wait for the period to reset.
-
Manage Your Email Size: Before sending, ensure your emails, including attachments, do not exceed the size limits. Compressing attachments or using cloud services for large files can help.
Account Suspension or Blacklisting
Other reasons might include non-payment for the email service or reaching the storage limit.
Steps to Resolve Email Suspension
-
Identify the Cause: The first step is understanding why your account was suspended. intoHOST typically sends a notification detailing the reason to your registered contact email.
-
Secure Your Account: If the suspension is due to suspicious activity, immediately change your password and review your account for unauthorized changes.
-
Contact Support: If the suspension is due to a misunderstanding or policy violation, or if you've rectified the issue that led to the suspension, the next step is to contact us. You can open a support ticket here or initiate a LiveChat session using the icon at the bottom right of the screen for assistance in reinstating your account.
Preventing Future Suspensions
- Follow the Terms of Service: Always ensure you know and follow intoHOST's email service terms.
- Monitor Account Activity: Regularly check your account for any unusual activity and use strong, unique passwords.
Emails Are Marked as Spam due to Incorrect DNS Settings
Sometimes, your emails can land in the recipient's spam folder, which may look like they are not being sent. This can happen for multiple reasons. The following are the most common reasons:
Common Symptoms of Incorrect DNS Settings
- The recipient does not receive emails you send.
- Outgoing emails bounce back with an error message about the email being undeliverable.
- Sent emails end up in the recipient's spam or junk folder.
How to Troubleshoot and Fix Your DNS Settings
Step 1: Verify Your MX Record
Ensure your MX record is correctly pointing to your email hosting server. If you're unsure what this should be, check with your hosting provider or refer to our cPanel control panel guide for setting up MX records.
Step 2: Check and Update Your SPF Record
Your SPF record must include all the mail servers you use to send emails. This includes your web server, any third-party email services like our professional email service, and any email marketing platforms you use.
Step 3: Ensure DKIM is Properly Set Up
DKIM records can be a bit more complex to set up. You might need to generate a DKIM key and add it as a DNS record. Check with your email service provider for specific instructions on how to do this correctly.
Other Reasons for Emails to be Marked As Spam:
- Email Content: Certain keywords or phrases commonly used in emails can trigger spam filters.
- Volume of Emails: Sending a large volume of emails quickly can also trigger spam filters and block outgoing emails.
Misconfigured Email Routing
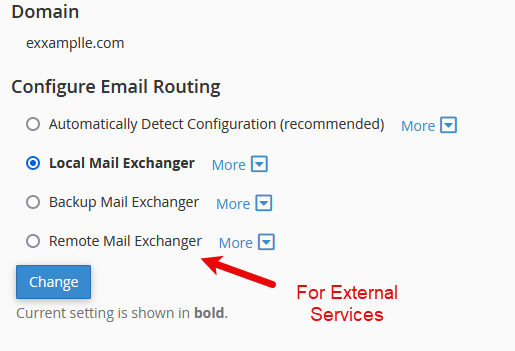
Email routing in cPanel controls how your server handles email delivery for your domain. The wrong settings here may result in your emails not being delivered. There are typically two settings:
- Local Mail Exchanger: Choose this if your emails are managed and hosted on the same server where your website is hosted.
- Remote Mail Exchanger: This setting is ideal if you use an external email service like Gmail for your domain's email.
Steps to Configure Email Routing in cPanel
-
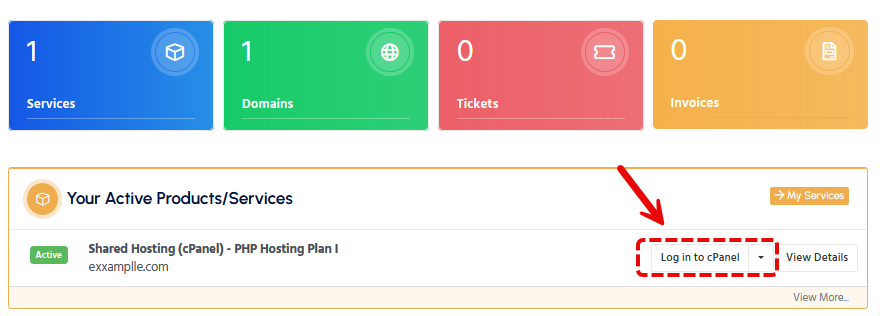
Login to cPanel: Access your cPanel dashboard through the WHMCS client area.
-
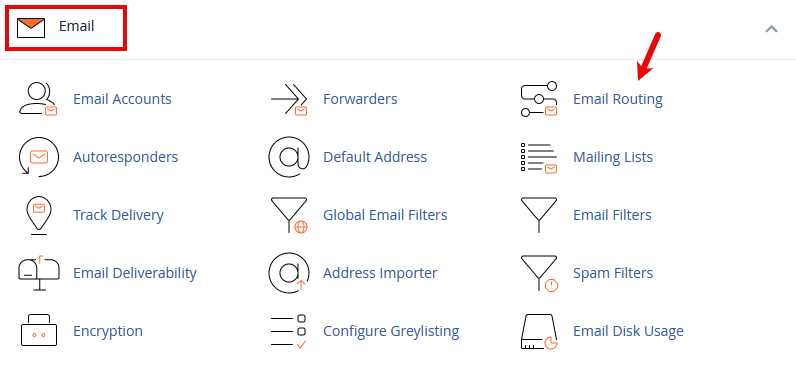
Find 'Email Routing': Navigate to the "Email" section and click "Email Routing".
-
Select Your Domain: Choose the domain to adjust the email routing settings.
-
Adjust the Settings:
- For External Email Services (Gmail, Hotmail, ZohoMail, etc.): Select Remote Mail Exchanger. This tells your server to route outgoing emails to the external service.
- For Local Email Hosting: Choose Local Mail Exchanger to keep the email traffic within your server.
Problems at Email Receiving Server
If there is a problem at the server to which you are sending email, it can result in emails getting bounced back. Here are some common reasons for non-delivery:
- Mailbox Full: The recipient's email inbox is full, and they can't receive any new messages.
- Mail Server Does Not Exist: The email address you're sending to is incorrect or the domain doesn't have a mail server configured.
- Server Temporarily Unavailable: The recipient's mail server is down or temporarily experiencing issues.
When You Encounter a "Mailbox Full" Error
- Inform the Recipient: If possible, contact the recipient through alternative communication methods to inform them of the issue.
- Retain the Email: Consider saving the email to send later or schedule it to resend automatically if your email client supports this feature.
If the "Mail Server Does Not Exist"
- Verify the Email Address: Double-check the recipient's email address for accuracy.
- Contact the Recipient: Use an alternative method to confirm their correct email address.
Handling a "Server Temporarily Unavailable" Message
- Wait and Retry: Give it time before resending the email.
- Check Server Status: If possible, check the recipient's mail server status online or contact their support team for information.
Firewall or Antivirus Blocking Emails
Solution 1: Check Your Security Software Settings
The first step is to examine the settings of your firewall or security software. Look for any options about email or SMTP (Simple Mail Transfer Protocol) and ensure that your email client can communicate through the firewall.
Solution 2: Temporarily Disable Your Firewall/Security Software
To determine if the firewall or security software is the culprit, try temporarily disabling it and attempt to send an email.
Professional Email Solutions
If you're frequently encountering email issues, it might be time to consider a professional email hosting solution. Visit our Professional Email Service for reliable and efficient email communication that can help reduce the chances of encountering these problems.