
Email management is crucial for maintaining a clean and organized inbox, especially for those who receive a high volume of emails daily. cPanel, a popular web hosting control panel, offers powerful tools for managing emails, including filtering incoming messages. This article guides you through using email filters in cPanel, from basic understanding to advanced settings.
Introduction to Email Filtering in cPanel
What is Email Filtering?
Email filtering is a process that automatically sorts incoming emails based on predefined criteria, such as sender, subject line, or keywords. This allows you to prioritize, organize, or even block certain emails from reaching your inbox.
Why Use Email Filtering?
- Improve productivity: By reducing clutter in your inbox, you can focus on emails that require your attention.
- Enhance security: Filter out potential spam or phishing emails to protect yourself from online threats.
- Automate organization: Automatically sort emails into folders based on project, client, or importance.
Email filters are rules that you set up to manage how incoming emails are handled. These rules can sort emails into folders, delete spam, forward emails to another account, and more, based on criteria you define.
Types of Email Filters
There are two main types of email filters in cPanel: Global Email Filters and User-Level Email Filters.
-
User-Level Filters: These filters apply to email addresses under your cPanel account. They are perfect for managing personal emails or emails directed to specific addresses within your domain.
-
Account-Level Filters: These filters apply to all emails received by your domain. They are ideal for implementing broad rules that affect all email users under your domain, such as blocking spam or forwarding all emails to a specific address for archiving purposes.
How to Set Up Email Filters in cPanel
-
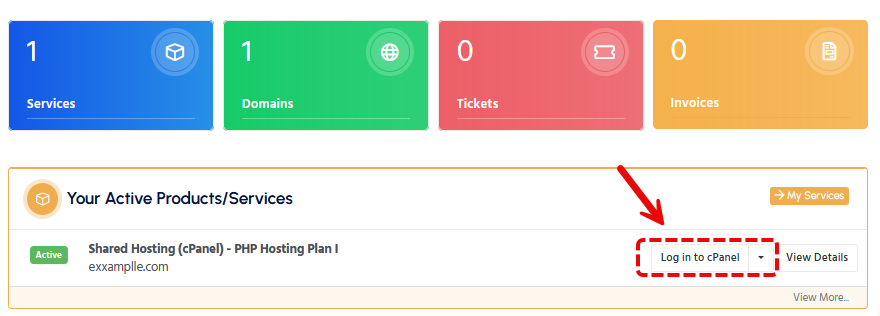
Log in to cPanel: First, access your cPanel dashboard. You can usually do this by adding
/cpanelit to the end of your website URL or through the WHMCS client area at https://intohost.com/. -
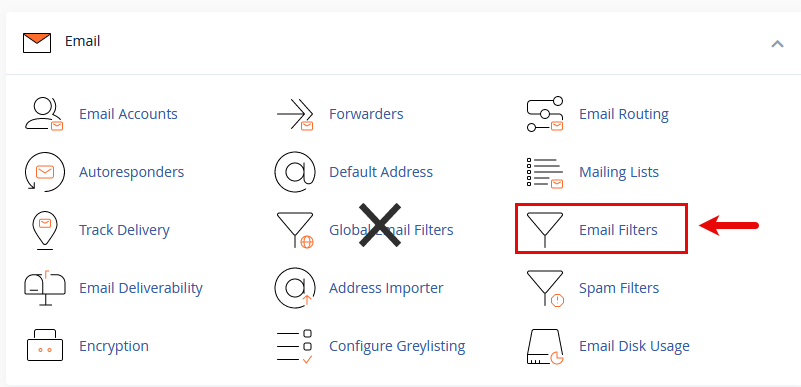
Navigate to Email Filters: Once logged in, look for the "Email" section and click "Email Filters". Here, you'll see a list of your email accounts.
-
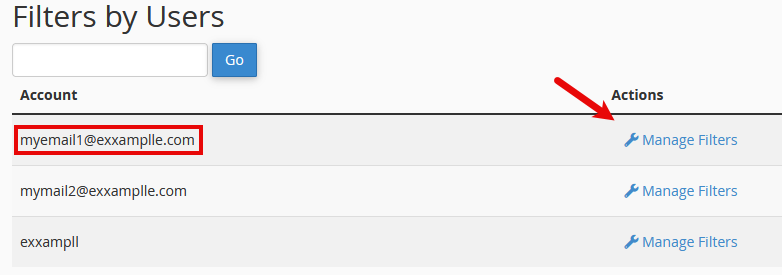
Select an Email Account: Choose the email account you want to set filters for by clicking "Manage Filters" next to it.
-
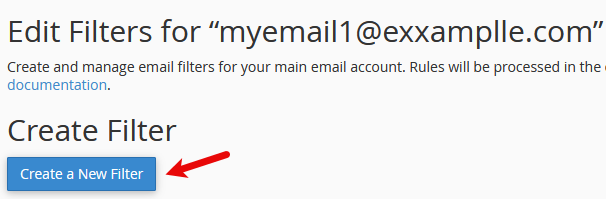
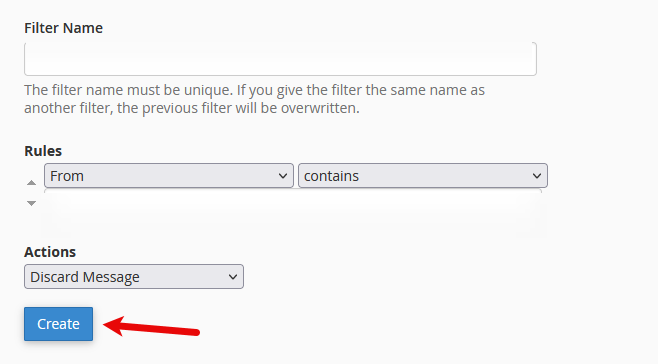
Create a New Filter: Click on "Create a New Filter". Here, you'll give your filter a name and define its rules and actions.
-
Define Filter Criteria: Specify what to look for in the emails. This could be in the email's subject, address, or body. For example, you can filter all emails containing the word "invoice".
-
Choose Actions: Decide what happens when an email meets your criteria. Actions include moving the email to a specific folder, deleting it, or forwarding it to another address.
-
Save the Filter: Once you're happy with your setup, click "Create" or "Save" to activate your filter.
Step 1
Step 2
 Step 3
Step 4
Step 5
Step 6
Step 7
Tips for Effective Email Filtering
- Be Specific: The more specific your filter criteria, the less likely you are to miss important emails or catch too many in your filter.
- Regularly Review Filters: Over time, your email needs may change. Periodically review and adjust your filters to stay efficient.
-
Prioritize Your Filters: Start by identifying the types of emails that you receive frequently and categorize them based on priority. For instance, emails from your boss or key clients can be tagged and moved to a priority inbox.
-
Use Specific Criteria: Be as specific as possible when setting up filter criteria to avoid misfiltering important emails. For example, use unique words or phrases that are likely to appear in the emails you want to filter.
-
Regularly Update Your Filters: As your email communication evolves, so should your filters. Regularly review and adjust them to ensure they remain effective.
-
Test Your Filters: After setting up a new filter, send yourself test emails to ensure it works as intended. This will help you catch any issues early on.
Common Use Cases for Email Filters
1. Filtering Spam
One of the most common uses of email filters is to combat spam. By setting up filters that recognize common spam indicators (like certain phrases or sender addresses), you can automatically move these messages to a spam folder or delete them.
2. Organizing Emails by Sender or Subject
If you receive many emails from specific senders (e.g., newsletters, notifications from social media platforms, etc.), you can create filters to automatically move these emails into dedicated folders. This helps keep your primary inbox focused on personal or critical work emails.
3. Automating Responses
For business users, setting up a filter to automatically reply to certain emails can save time. For instance, if you receive customer inquiries about a common issue, a filter can send an automated response with a link to a FAQ page or knowledge base article.
4. Protecting Against Phishing Attempts
By identifying common characteristics of phishing emails, such as suspicious attachments or links, you can set up filters to delete these emails automatically or move them to a separate folder for further review.
5. Spam Management
Spam management is a critical component of email filtering. cPanel has tools like SpamAssassin, a powerful spam filter that identifies and marks spam emails. It uses a scoring system to evaluate the likelihood that an incoming email is spam. You can adjust these scores and customize their behavior to suit your needs.
Best Practices for Email Filtering
-
Back-Up Your Emails: Back up your inbox before applying new filters, especially if you’re setting up rules to delete certain emails. This will prevent accidental loss of important emails.
-
Layer Your Filters: Start with broad filters and create more specific ones to fine-tune your email sorting. This layered approach helps in managing a wide variety of email types without overwhelming your inbox.
-
Educate Your Team: If you’re setting up filters for a business email account shared with or accessed by multiple people, ensure everyone understands how the filters work and what actions they trigger. This prevents confusion and ensures smooth email management.
-
Leverage Professional Email Hosting Services: For businesses, leveraging a professional email hosting service can provide additional tools and support for managing email filters and combating spam. Check out our services for more information: Professional Email Hosting.
Example for Filtering Spam using Email Filters:
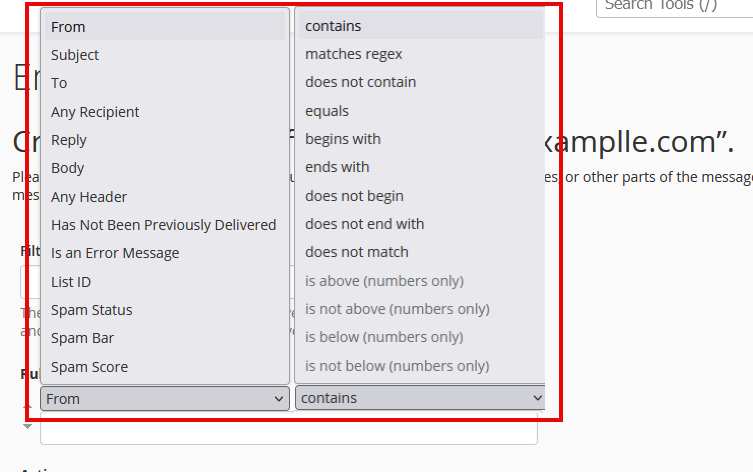
Before creating filters an example, let's understand the different criteria you can use to identify emails:
- From: The sender's email address.
- Subject: The subject line of the email.
- To: The recipient's email address.
- Reply Address: The address where the sender receives replies.
- Body: The content of the email.
- Any Header: Any part of the email's header.
- Any Recipient: Any recipient of the email.
- Has Not Been Previously Delivered: Focuses on messages still in the delivery queue.
- Is an Error Message: Targets error messages from auto-response systems.
- List ID: Identifies emails from specific mailing lists.
- Spam Status: Whether the email was marked as spam by Apache SpamAssassin™.
- Spam Bar & Spam Score: The likelihood the email is spam, based on Apache SpamAssassin’s criteria.
Choosing Operators for Precise Filtering
Operators let you define how to compare the email message with your criteria. You can choose from:
- Equals: Exact match.
- Matches Regex: Matches a regular expression.
- Contains / Does not contain: Whether the email includes or excludes a specific string.
- Begins with / Does not begin with: If the email starts with a certain string.
- Ends with / Does not end with: If the email ends with a specific string.
- Does not match: The email does not match the defined string.
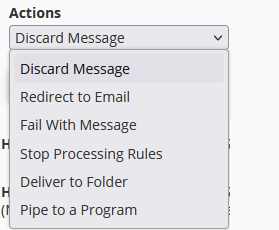
Actions You Can Automate
Upon setting your criteria and operators, you can choose what action to take on the filtered emails:
- Discard Message: Deletes the email without notifying the sender.
- Redirect to Email: Forward the email to another address.
- Fail With Message: Rejects the email, sending a failure notice back.
- Stop Processing Rules: Ignores subsequent filter rules for the email.
- Deliver to Folder: Moves the email to a specified folder.
- Pipe to a Program: Sends the email to a program for further processing.
Filtering Spam Setup Example:
Imagine you're receiving repetitive spam emails from a specific sender, which always contain the phrase "Exclusive Offer" in the subject line. Here's how you could set up a filter to deal with this:
- Criteria: Subject Contains "Exclusive Offer"
- Action: Discard Message
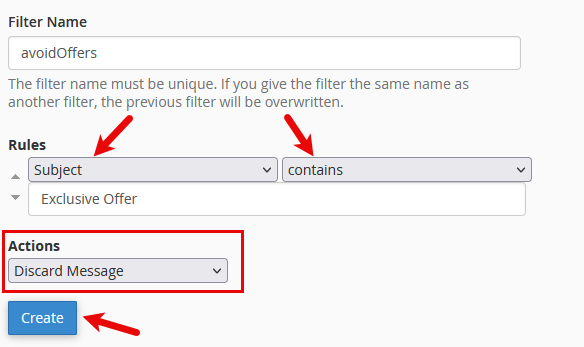
This simple filter will automatically delete incoming emails that match the criteria, keeping your inbox cleaner without any manual intervention.
Troubleshooting and Support
Reviewing the filter rules and testing with different scenarios can help if you encounter issues with your email filters. For persistent problems, please open a support ticket here or start a LiveChat session.
Conclusion
Email filters in cPanel are a powerful tool for managing your inbox efficiently. Understanding and utilizing these filters can significantly improve your email management and keep your inbox organized.
Remember, effective email management starts with well-thought-out filters. Start exploring cPanel's email filtering options today, and take control of your inbox!
For more information on our email services, visit our professional email service page.